I2C and SPI
I2C (Inter Integrated Circuit Communications, pronounced I squared C) and SPI (or Serial-Peripheral interface) are protocols that can link a microcomputer to other micros or integrated circuits.
Both protocols are widely used in hobby electronics and robotics projects.
I2C was originally developed by Philips (now nxp) and is used in all sorts of equipment including virtually every tv, monitor and computer motherboard. I2C is a flexible protocol but has fairly limited bandwidth.
SPI was originally developed by Motorola (now Freescale). It’s simple and fast but has some limitations compared to I2C.
Most modern micro-controllers have hardware support for both protocols. Examples include the Arduino, mbed, BeagleBone, BeagleBoard and Raspberry Pi.
Let’s look at the two protocols in a little more detail.
I2C

I2C can be used to connect up to 127 nodes via a bus that only requires two data wires, known as SDA and SCL.
Since the devices need a common voltage reference (Ground) and a power line (referred to as Vcc or Vdd) the full bus has four wires, two for data and two for power. Sometimes additional lines are added, for example to support interrupts when the state of I2C devices change.
Since the devices need a common voltage reference (Ground) and a power line (referred to as Vcc or Vdd) the full bus has four wires, two for data and two for power. Sometimes additional lines are added, for example to support interrupts when the state of I2C devices change.
In theory the I2C bus can support multiple masters, but most micro-controllers can’t. A master is usually a microcontroller, although it doesn’t have to be. Slaves can be ICs or microcontrollers.
In the diagram above a RasPi is a master and there are several slaves: a Digital-to-Analog converter (DAC), an Analog-to-Digital converter (DC), and an Arduino.
I2C can be used to control a very wide range of devices. Common examples include
- Digital-to-analogue converters (DACs)
- Analogue-to-digital converters (ADCs)
- LCD displays
- OLED Screens
- Keyboards
- Motor drivers
- LED drivers
- Memory chips and cards (EEPROM, RAM, FERAM, Flash)
- bus expanders/extenders (chips with 8 or 16 I/O pins controllable via I2C)
- other microcontrollers
When the master wishes to communicate with a slave it sends a series of pulses down the SDA and SCL lines. The data that is sent includes an address that identifies the slave with which the master needs to interact. Addresses take 7 bits out of a data byte; the remaining bit specifies whether the master wishes to read (get data from a slave) or write (send data to a slave).
Some devices have an address that is entirely fixed by the manufacturer; others can be configured to take one of a range of possible addresses. When a micro-controller is used as a slave it is normally possible to configure its address by software, and for that address to take on any of the 127 possible values.
The address byte may be followed by one or more byes of data, which may go from master to slave or from slave to master.
When data is being sent on the SDA line, clock pulses are sent on the SCL line to keep master and slave synchronised. Since the data is sent one bit at a time, the data transfer rate is one eighth of the clock rate. The original standard specified a standard clock rate of 100KHz, and most I2C chips and micro-controllers can support this. Later updates to the standard introduced a fast speed of 400KHz and a high speed of 1.7 or 3.4 MHz. The Arduino can support standard and fast speeds; the BeagleBoard has three I2C busses, one at each speed; the RasPi and BeagleBone can both support standard and fast I2C.
The fast rate corresponds to a data transfer rate of 50K bytes/sec which is too slow for some control applications. One option in that case is to use SPI instead of I2C.
------------------------------------------------------------------------------------------
------------------------------------------------------------------------------------------
Arduino: I2C Communication between 2 Arduinos with Wire Library
The next method of communication I will look at is I2C communication. I2C stands for Inter-integrated circuit. It allows one master device to connect to a large number of slave devices using only 2 pins (signal and clock). The nice folks at Arduino have made this very easy with the Wire library. It is included with the Arduino IDE and is supported on most Arduino boards.
Before we begin you may want to peruse the Arduino website. The Wire library is described HERE and detailed HERE. When you finish those, let's dive in.
The first thing I did was run the master_reader and slave_sender examples. This was very easy. It sends hello from the slave to the master and displays it on the serial monitor.
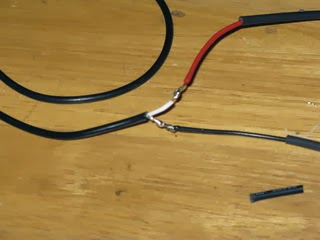
 Below is a picture of the wiring. It is simple. Wire the SCL pins and the SDA pins together through a pull-up resistor. I used 4k7. A good example can be found at THIS instructable. You also need to connect the grounds of the two boards as well as the vcc. I copied over the diagram for convenience (to the right).

Next I decided to make it transmit something useful. I made an I2C HC-SR04. The slave Arduino constantly takes distance measurements with the HC-SR04 sonar module. The master Arduino can then poll the slave whenever it wants to get the current distance measurement.
Wiring is the same as above. Make sure you use your pull-up resistors. I connected the trigger pin of the sonar to pin 7 and the echo to pin 8, but you could use any of them.

HERE is my code. Hopefully I will have time to rewrite the slave for the ATtiny in the future. That is the plan. Right after wireless communication, robot arm, computer vision..
Matthew
Before we begin you may want to peruse the Arduino website. The Wire library is described HERE and detailed HERE. When you finish those, let's dive in.
The first thing I did was run the master_reader and slave_sender examples. This was very easy. It sends hello from the slave to the master and displays it on the serial monitor.
Below is a picture of the wiring. It is simple. Wire the SCL pins and the SDA pins together through a pull-up resistor. I used 4k7. A good example can be found at THIS instructable. You also need to connect the grounds of the two boards as well as the vcc. I copied over the diagram for convenience (to the right).Next I decided to make it transmit something useful. I made an I2C HC-SR04. The slave Arduino constantly takes distance measurements with the HC-SR04 sonar module. The master Arduino can then poll the slave whenever it wants to get the current distance measurement.
Wiring is the same as above. Make sure you use your pull-up resistors. I connected the trigger pin of the sonar to pin 7 and the echo to pin 8, but you could use any of them.
HERE is my code. Hopefully I will have time to rewrite the slave for the ATtiny in the future. That is the plan. Right after wireless communication, robot arm, computer vision..
Matthew
SPI
The SPI interface was originally developed by Motorola (now Freescale). SPI is much simpler than I2C. Master and slave are linked by three data wires, usually called MISO, (Master in, Slave out), MOSI (Master out, Slave in) and M-CLK.
As the names suggest, the M_CLK line carries clock pulses which provide synchronisation. When a transfer is taking place, a bit of data is transferred via MOSI from Master to slave and at the same time a bit of data is transferred via MISO from Slave to Master. At the end of eight clock pulses an entire byte of data has been transferred in each direction.
Many SPI-enabled ICs and Microcontrollers can cope with data rates of over 10MHz, so transfer is much faster than with I2C. The downside is that SPI normally has no addressing capability; instead, devices are selected by means of a Chip Select signal which the master can use to enable one slave out of several connected to the SPI bus. If more than one slave exists, one chip select line is required per device, which can use precious GPIO lines on the Master.
SPI is less well specified than I2C, but the SPI module on the Broadcom chip at the heart of the Raspberry Pi is flexible enough to cope with most common SPI devices.